![]()
Realistic Art Is Math
Why I Think Realistic Art Is Math
We know that art can be traced back to the earliest development of human beings. Although its origins are hard to exactly pinpoint, art has still managed to be a big part of our lives. Art is influential, thought provoking and fascinating to us all. Now you must be wondering what inspired me to write this post? Well, My favorite artist of all time has been Leornardo Da Vinci; even though there are so many artists today who make stunning masterpieces that look HYPER REAL but growing up, I was heavily inspired by Da Vinci when I was learning to draw and I still am. Why?
Because Leonardo Da Vinci broke down realistic art into understandable math. Learning about Leonardo’s work and history made me wonder if I could resolve my fine art into a pattern or into math. This in turn would help me create consistent results in my drawings and paintings. So I gave it a go and it worked WELL!
Math To Create Realistic Art
This might sound strange when you read it but there may be some well known evidence of this. Don’t believe it? Ever hear of the Golden Ratio, Rule of Thirds, Rule of Odds? These rules are a mathematical representation of balance and interest in a composition. That’s why I referred to them as compositional math (in my own art language ;) you can research more on these if you want) but there’s more. Think of what realism art actually is. It is a reflection of what artists see. And what do artists see when they are painting? In realism at least, it is what is in front of them; the subject they are trying to create an impression of and hopefully paint or draw it as close to their reality as possible. And reality or what we see; in simple words, is composed of math and science, the patterns in nature.
How Do I Use This Math In My Art?
So how do we break down the reality we see into simple math that will help us make realistic art easier? There are a few ways that we can achieve this.
1. Graph method
Using xy coordinates to determine the position of each element of your artwork. This is quite in-depth and requires a lot of patience but is probably easier than the others below. Just imagine you’ve placed your subject into a photo frame. Draw a graph on your drawing paper; You can start from a wider grid and work your way into a more complex graph. Start drawing contours by referencing xy coordinates.
You will use this method for every part of your artwork creation from contouring, shading to texture. With this method, you can place every level of detail that you are seeing. Like I said, this one requires patience and perhaps a lot of practice. See below image of a drawing I made using this method.

2. Simplification
Breaking down the subject into 3d shapes to deconstruct the subject first and reconstruct details layer by layer. I have a full article on this. Check out the simplification article. I’ve used this method literally for everything and it works really well. Example of simplification method is in the below image.

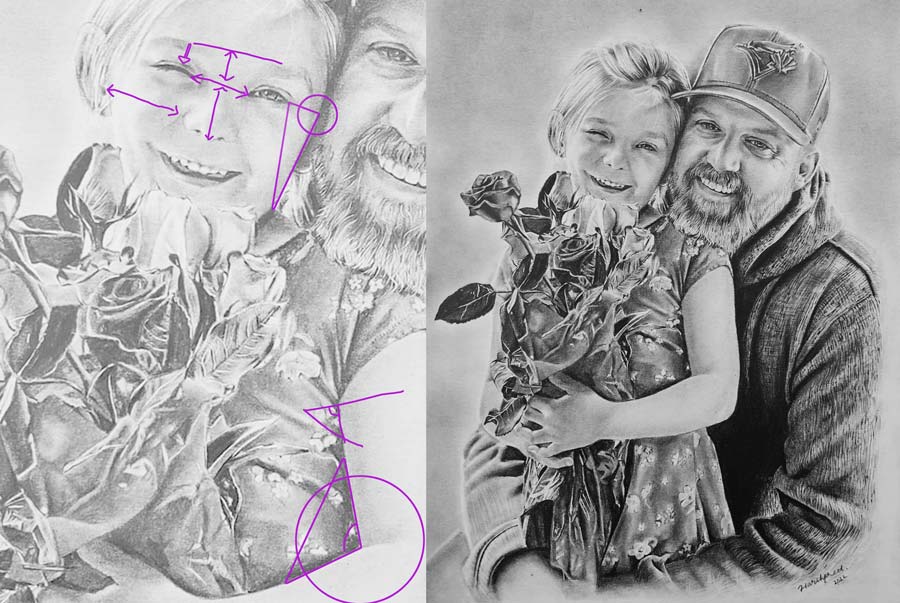
3. Relative Proportions
The distance of the subject’s elements in relation to elements around and within the subject. This method only sounds complex but with time/repetition gets actually quite easy in practice. An example of this will help you understand this better.
If you are drawing a dancer in a dynamic pose; you may have an arm lifted up and legs moving a certain way. You will start with a gesture line to show the pose and then you would want to draw a 3d mannequin of the dancer. To draw the mannequin/gesture lines, you will need to know the relationship between the foreground and background; how far one arm is from the other and at what angle; how far is the dancer’s face from the left arm and right arm, how long is the dancer’s torso compared to the legs and overall body length and this goes on and on. This method utilizes distance, angles and other relationships to determine the contours of the subject and the same can be used for shading and texture.
See example of this method in this pencil drawing commission of a father and daughter I did to get a visual understanding
All of the above methods can be used for making realistic art live (life drawing) or from a photo reference.
Sharing Is Caring
Yes, I was good at math and science when I was in high school. However, I couldn’t fully understand the text written in the school books, my imagination helped me in getting good grades but what I really wanted was to see the practical use of mathematical and scientific concepts in my everyday life. My internal need was to understand my own environment and reality. Since I couldn’t find a way to explore my interests in math and science the way I wanted to, I manifested my fascination for these subjects in art. When I got asked how I drew realistic portraits, my younger self didn’t have a way to articulate the answer. Time has flown by since then and I can finally explain that Realistic Art is Math and perhaps Science put into practice.
I aim to share with other aspiring artists that if realistic art is simple math, then anyone with an interest can draw or paint just like I do; just like so many other artists do. It is more technical than it is creative. Without a doubt, give these methods and see for yourself! You will be surprised.