Drawing From A Picture - Tips & Techniques
In this article, I will be giving you some practical tips on how to start drawing realistic pictures; or even if you are already drawing and need some techniques to help you improve your existing artworks, you will find these very useful. There is no cookie cutter recipe for drawing anything. Each subject/object has its own uniqueness. So, I'm going to be giving tips to help you understand realistic drawings instead of just working off of one picture to draw. If you are looking for a partcular tutorial or need help with drawing a specific picture, feel free to email me at info@harshpreetkaur.com and I will guide you on how to go about drawing that. I do not charge for a general guidance on your work.
Let’s get right into it! Now, some of these may sound very common and simple but are usually the biggest deal breakers. Drawing realistic itself is a simple skill but definitely needs some very small details perfected that together make all the difference.
1. Add Midtones - so IMPORTANT!
Since that art class in high school, we are told it’s all about light and shade (unless you’re creating abstract art - in that case, you’re the pro!). Light and shade together make our surroundings visible to our eyes. Whatever is on the bright side is lighter (highlights), and whatever is in the shade is the shadow.
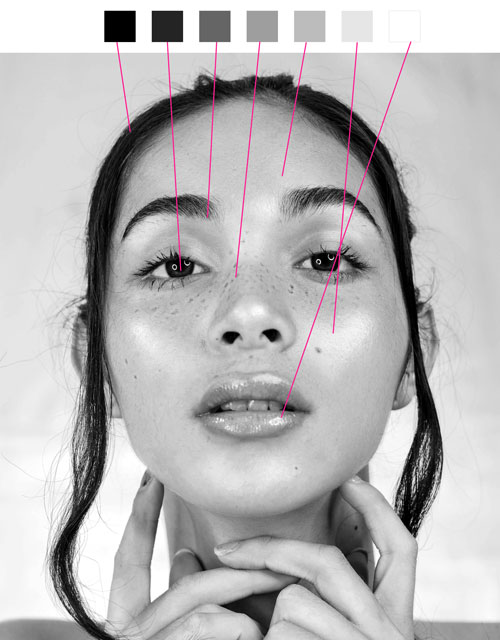
What about areas that are not directly on the bright side or directly in shade? This area generally will be the midtone which is lighter than the shadow but darker than the highlight. Now, you can go into as much detail as you want but overall, we need three main tonal values to shade a drawing - highlights, shadows, and midtones. And midtones are so often missed!! This value adds volume to the drawing and in fact, is of utmost importance to make any realistic drawing you desire.
Here is a visual guide on how to identify highlights, shadows, and midtones. I have used a stock image from Pexels.com to show the different tonal values on this portrait.

The key here is not to leave areas of subject with no tonal values when there is a lighter shade present or needed. Do not leave certain areas of your drawing blank with no tonal value unless it’s a highlight or if you are using toned paper like gray or sepia. With colored paper, the light color acts as a midtone value. So in that case, you may not need it.
2. Identify shadows and highlights after drawing outlines
This tip is for those who jump right into shading without identifying the tones. Before drawing, a great habit is look at the picture you are drawing and observe where the light is falling and which areas are brightest and which ones are darkest. Shadows across your picture are not the same level darkness. Look for the darkest shadow and then compare the rest of the shadows. Same for your highlights - notice which is the brightest highlight and the ones are not as bright but will still be considered a highlight.
This exercise helps you create a scale of different gray tones (swatches). Then when you start drawing, you already have a good idea of how the drawing will be shaded all across.
As always, here is a visual representation of grayscale on this sample picture. This picture is also from pexels.com.

A really valuable tip that I always share with my students is:
Start with lighter values for shadows so if you decide to change or twist something, you can easily use your kneadable eraser or a cotton swab to lighten the shadow as needed. You can always darken as much as you want but if you start really dark on your drawing, you may not be able to revert it.
Another important tip is to avoid really harsh/dark lines that do not blend in easily. Darkest lines as much as possible should be added at the end because they cannot be erased or reverted. You may be able to erase them forcibly but will be extremely bad for your paper’s texture. So I recommend starting really light and then make your way to the darker lines of your drawing.
3. Make skin folds, cloth folds and similar very soft
This is specifically for drawings that involves making inorganic material like a curtain or an outfit etc. The game changer is drawing softer (use a q-tip for soft shading). In our surroundings, cloth and similar do not have harsh corners at all. Keeping that in mind, draw and shade these materials accordingly. Your art lovers should be able to feel the softness of the cloth without touching it. Same tip for those who love drawing hair and fur (like me!).
See below for an example of a cloth drawn very softly compared to one drawn harshly.

4. Add texture - do not forget every surface has texture
EVERY SURFACE has texture even if it is something like a flat paper. Surfaces can be smooth, harsh, and mixtures and so on. After you add the highlights, shadows, and midtones; and adding any backgrounds you want, pay attention to the texture! For example, when drawing a portrait of a person, look for the skin texture and pores. If drawing a metal, look for tiny details like scratches on the metal. These are some very minor examples. Textures is something that could take a long long article to fully understand and grasp. I may write that down sometime soon so keep watching.
This is all I got in this one. Remember, drawing is a skill that needs training and practice to make it an unforgettable muscle memory.
