![]()
How to draw anything by simplifying the picture into shapes
Every object can be simplified into 2d and 3d shapes for easier drawing. This article explains how to use 2d shapes - triangle, circle, square, and rectangle) and 3d shapes - Cone, Sphere, Cube, and Cuboid to draw an object accurately.
The 2d shapes simplify object contours and 3d shapes help simplify shading. These are NOT RULES but act as guides that make it easy to understand subject contours and outlines. I will be using multiple references to explain concepts so I can cover a wide range of objects/subjects. If I have a new reference, start a new drawing afresh so you can practice the previous concept again.
Let’s begin using shapes to draw pictures!!
1. Deconstruct into simple geometric shapes
This is the first and foremost step - this is to identify basic shapes in the subject. These shapes should essentially identify what the object would look like if there was no dimensions or texture, and no curved edges (for the most part) - only 2d shapes.
Take, for example, the image of this lamp below from Pexels.
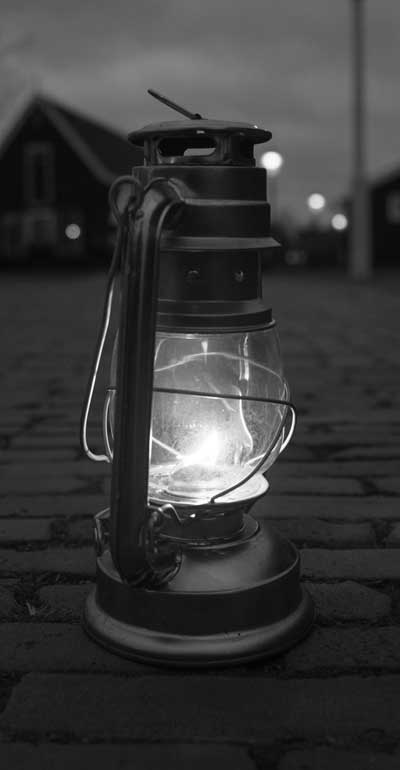
On first glance, it might seem complicated to draw given there’s so many variations in the form but in 2d, it looks less intimidating. The full lamp can be simplified using rectangles like this. If you are feeling confident about the drawing, you can also draw the wires and handles using curved cylinders like this.


It is very important to draw this proportionally. If you struggle with drawing shapes properly, use a hypothetical vertical line (line of symmetry) in the middle that can be used as a reference to draw this correctly. Or you can measure the left and right sides with a ruler initially but it is best if you train your eyes to spot the irregularities.
Rectangles like below are NOT ACCEPTABLE unless they represent the shape of the area well - this will come with practice but please keep refining this skill as it is very important.

2. Using 3d shapes to add dimension
Adding dimensions to 2d shapes is easier now that we have a simpler structure drawn on paper. If you did the above step and have an understanding of cubes, cuboids and spheres, this should be smooth. Let’s take a look at the picture of a camera below - full image at Pexels.
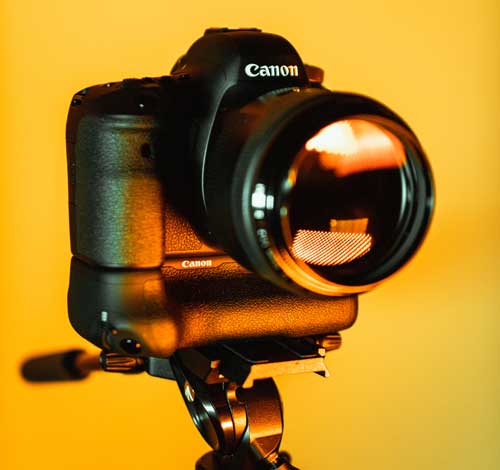
You should be able to spot the main 2d shapes now but here is a reference if you need help.

For 3d shapes, let’s look at the very basic shape of a camera - you guessed it - Cuboid! A camera is basically a cuboid with more detailing on it. So draw a cuboid facing right just like how the image has the camera facing right. On the top of the camera, draw another cuboid (the front face to the right being a trapezius) and now extend this cuboid forward as some of this part follows towards the lens outside of the cuboid. Then right below this is another cuboid. This will be the base of the lens (cylinder) extension.
Do this until you have a full 3d skeleton of the camera ready. This may time time to perfect but once you have good practice, this will be super quick. Below is sort of what your drawing should look like.

I recommend working on step 1 and step 2 on multiple objects and subjects to get an in-depth understanding and working knowledge of this concept. DO NOT BE AFRAID TO RESTART!!
Here is another example of a subject (hand, in this case) simplified by shapes.

Once you are happy with this drawing, move on to the next part.
3. Add details, blending, and finishing up
Congrats ! You made it this far!! This step is now the testing time - meaning, it will decide the final outline of your drawing.This step requires you to have good control on your stroke thickness, stroke intensity, and shading (if you plan to add lights and shadows to your drawing). Now that you have your 3d structure all ready, you need to smoothen out edges where you need. For instance, in the camera, the top part (cuboid/trapezius) had rounded corners so this will be the time to do just that. You can move further by adding more details like adding the texture. This article is focused on Simplification only but if you really are unsure how to go further then go ahead and read my Improve your Drawing article; I have shared some really important tips that can help you transform your drawings in the right direction.
That’s all for now!
If you need more guidance on any of the above, please reach out to me on my email info@harshpreetkaur.com and attach the drawing you are working on so I can give you my insight and possibly some useful tips. Till then, keep practicing.