![]()
Realistic Fine Art with Graph, Relative Proportions, and Simplification
#
CONTOUR DRAWING METHODS:
Graph Method, Simplification, and Relative Proportions
Pencil Pressure: Foundation Skill for Allowing Corrections
Pencil is the foundation of drawing and deserves more time and practice than any other art medium. The first mistake when starting out is pressing the pencil too hard against the paper, it leaves an impression on the paper and these lines will be extremely hard to blend in when you begin shading. ALWAYS draw lighter to start with. Once you're used to controlling pencil pressure, it'll become much easier to draw a basic stucture to work on further.
Graph Method:
Drawing a graph using two coordinates to determine the position of each element of your composition ensures accuracy in structure and small details. This method can be used for easy subjects but it's best for detailed studies and requires a lot of patience. Draw a graph on your drawing paper; start from a wider grid and work your way into a more complex grid where needed.
Start drawing contours by referencing two coordinates (just like you would reference cells in Excel). You can use this method for every part of your artwork creation from outlines to drawing texture. With this method, you can place every level of detail that you are studying. Like I said, this one requires patience and perhaps a lot of practice.
Simplification and Mannequinization:
Gesture Lines: Gesture lines as the name suggests are the lines that show movement in human figures. These lines are drawn as simple as possible to convey the posture of the subject. There are 3 ways gestures can be drawn - S-Curves, C-Curves, and Straight Lines. These lines illustrate movements/gestures really well. See some examples of S curve, and C curve below.

After learning application of gesture lines, you can use armature drawings to build understanding of anatomy. Below are examples of gesture lines (left of the image) and on the right is an example of a simplified armature drawing.

Armature drawings can be practiced from artist mannequins (easily available at art stores). When drawing objects, these are referred to as lines of symmetry.
Using Relative Proportions in Human Figures
Relative proportions help artists draw an armature (a simplified skeleton) of the subject. Armature is drawn as the next layer on top of the gesture lines. You'll need to approximately determine distances and approximate angles in the subject of study eg: distance from head to arm, at what angle we need to draw the arm, and how long is the torso compared to the full body. Then, using the gesture lines as a reference, start drawing a 3d mannequin/armature with 3d shapes like spheres and cylinders. This process is called Mannequinization (simplifying human figures into 3d shapes).
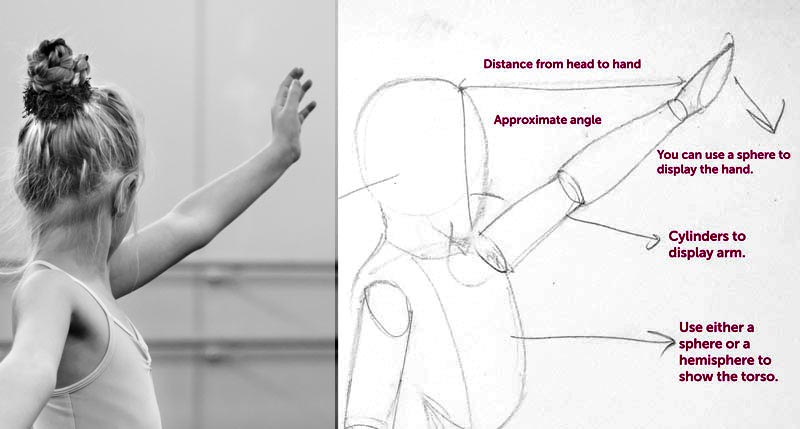
Mannequinization makes the process of shading and lighting easier as evaluating tonal values (highlights, shadows, and midtones) on these shapes is easier than on a complex object/subject and when studying human figures, also helps you remember joint movements quicker.. Especially in figure drawing, this is a very important concept to ace.
This is not only for portraits and figures, you can use this for your still life drawings as well.
Simplification: Deconstruct into Simple Geometric Shapes
Every object can be simplified into 2d and 3d shapes for easier drawing. This article explains how to use 2d shapes - triangle, circle, square, and rectangle) and 3d shapes - Cone, Sphere, Cube, and Cuboid to draw an object accurately. The 2d shapes simplify object contours and 3d shapes help simplify shading. Similar to Mannequinization, the simplification technique makes it easier to draw the contours of an object. This process essentially breaks down the object into 2d shapes first and then adding dimension using 3d shapes: cone, cube/cuboid and cylinder. This is relevant when you are drawing human figures and complementing the composition with an object. Drawing something like a glass will be as simple as just one cylinder. In a more complex object drawing, simplifying would make the drawing process less intimidating. See illustration below.
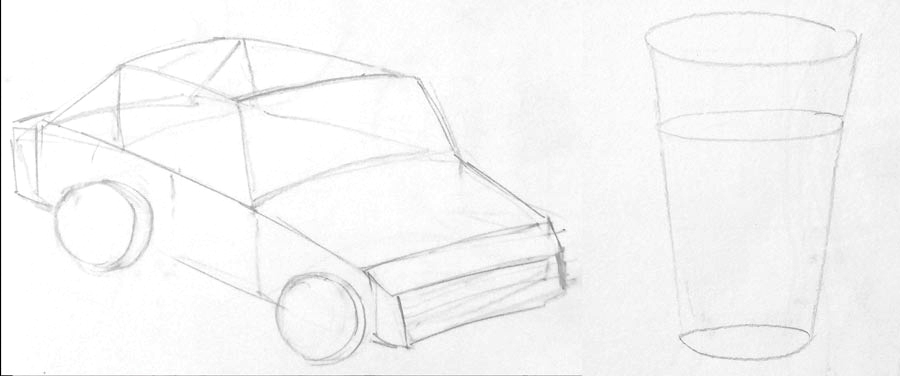
This isn't a pretty looking car but once you have this type of drawing ready, adding details to make it pretty and realistic is much easier and faster.
Adding Details to Contours
This step is now the testing time - meaning, it will decide the final outline of your drawing.This step requires you to have good control on your stroke thickness, stroke intensity, and shading (if you plan to add lights and shadows to your drawing). Now that you have your 3d structure all ready, you can start drawing muscle form and in object/still life studies, you can smoothen out edges where you need.